

How To Change The Fuel Sending Unit 2011 Camaro
Tools And Materials Needed:
Definition And Description Of A Fuel Tank Sending Unit
A Fuel tank sending unit is a term for the mechanical assembly within your fuel tank which measures the level of liquid in the tank, then reports its findings to the fuel gauge on your instrument cluster. All sending units incorporate a "bladder" piece which does just what it describes - floats atop the surface of the fuel. Many automakers design the float piece equally an attachment on a hinged arm that pivots as the level in the tank rises or drops. Others pattern the float piece as a cylinder that rides up and downwards effectually a metal shaft.
The bladder'southward arm is attached to a variable resistor. As the float arm moves with changes in fuel level, the resistance changes. This changes the amount of current sent to the fuel approximate, which in turn changes the gauge's reading.
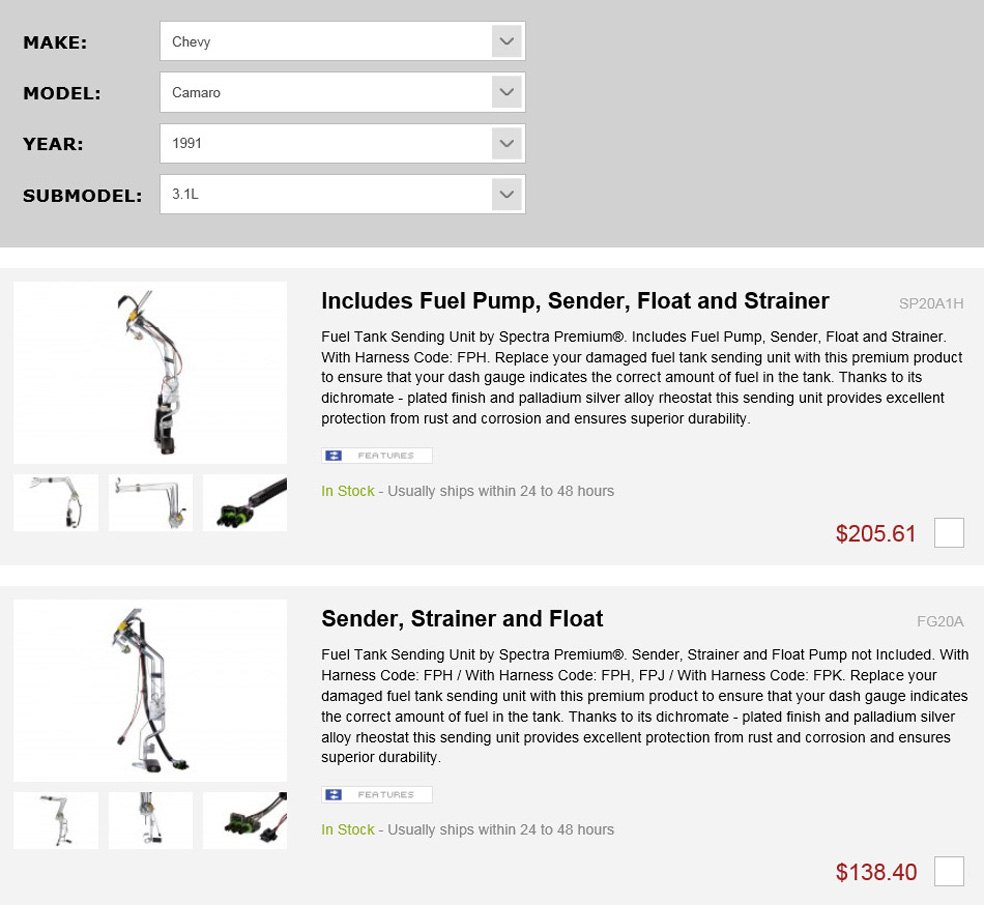
As often happens with automotive technical terms, this part may also be listed under unlike names. Depending on your vehicle, this part may also be called a "Fuel Pump Module Assembly" or a "Fuel Pump Hanger Assembly". This raises an important distinction: some "fuel tank sending units" are designed to include a fuel pump, while some are not. More almost this under "ORDERING AND REPLACING".
Reasons To Replace Your Fuel Tank Sending Unit
Over fourth dimension, the electric components in fuel sending units tin short out and produce no fuel level reading, or the mechanical components tin can deteriorate and produce a non-changing, fluctuating, or completely inaccurate reading. Fuel pumps tin can too fail. A consummate pump failure will result in a non-running engine. Nevertheless, the pump may slowly lose its ability to deliver the required fuel pressure. This can be caused past contaminants in the fuel, or just onetime age. A fuel pump delivering less fuel than needed will cause the driver to feel hesitation, bucking, or stalling.
Considering the fuel sending unit of measurement associates is mounted at the tiptop of your fuel tank, it's relatively like shooting fish in a barrel to replace on virtually mod vehicles equipped with purpose-built admission ports. In this commodity, we'll cover the steps involved in replacing the fuel sending unit on vehicles where like shooting fish in a barrel access is possible.
It tin can besides be easy to remove the unit for inspection and testing. For case, to verify that an inaccurate fuel judge is caused by a bad sending unit, some technicians will remove the unit from the gas tank and manually manipulate the float arm, watching for changes in the gas gauge. A visual inspection may as well turn up other bug, such as a clogged filter, loose connections, or deteriorated hoses.
Ordering And Replacing Your Fuel Tank Sending Unit
Every bit briefly mentioned in a higher place, some replacement units are bachelor with the fuel pump assembly, and some without. You need to understand why the fuel tank sending unit is beingness replaced and order accordingly! Looking at the analogy beneath, the possessor of this car has the option of purchasing the fuel pump. So if information technology'south the sender which is defective, some expense can exist saved. If, on the other hand, it's the fuel pump which is bad, the owner must be certain to select the option which includes the pump, and not only gild the cheaper choice.
If y'all accept a vehicle without a fuel tank admission console, the whole fuel tank will demand to be unbolted and dropped down - a separate process we won't be covering in the scope of this article. Briefly, that job involves removal of all fuel from the tank, and on some vehicles, lowering of exhaust and/or suspension components. One time the fuel tank is out of the machine, the steps involved with the actual sending unit removal and reinstallation are similar.
Steps Involved
Annotation! Be careful! You are working near gasoline. You lot must not smoke, take open flame, or create sparks. Ever have a fire extinguisher nearby.
i. Because your fuel lines remain under pressure (very high force per unit area on some vehicles), information technology'southward of import to salvage that force per unit area first. Check your owner's transmission for the location of the vehicle's fuel pump relay, and remove the relay to deactivate the fuel pump. Turn the ignition key to crank the engine, which will kickoff and stall several times once no fuel is beingness pumped to it. When the engine no longer catches even a little, the fuel lines you'll be disconnecting have been depressurized.
ii. Disconnect the negative bombardment cablevision to ensure whatsoever possibility of sparks around gasoline is eliminated. Annotation! Some vehicles volition have radio pre-sets erased when the battery is disconnected. It is a best practice to record the pre-sets and then that the radio can be easily reprogrammed.
3. Open your fuel cap to relieve any built upward pressure in the tank.
4. Consult a repair manual for your specific vehicle to locate the access port for the top of your fuel tank. On many vehicles, the top of your fuel tank can be accessed by opening a "trap door" that's located underneath the rear seat cushion or underneath carpet on the trunk floor. The removable cover piece should be secured by screws or small bolts that require only basic hand tools to remove. Vehicles with rear seat admission typically design the seat cushion and so it'due south easy to pull out.
Once the access encompass panel has been removed, you'll be looking directly down at the acme of the fuel tank. You'll run across what looks like a round chapeau - this is actually the top of the fuel sending unit assembly. On information technology, there are connecters for the wiring harness which run to your fuel gauge.
Unplug any connectors and motion the wiring to the side. Notation! If there is more than one connector, a best exercise is to characterization the connectors to ensure correct reassembly. Disconnect and remove any fuel hoses which are attached to the sender, over again labeling hoses if in that location is more than than one.
5. Almost fuel tank sending units are held in identify with a lock ring, which is rotated counter-clockwise to loosen. While at that place are special tools designed to perform this job, you commonly tin accomplish the removal with a pair of groove-articulation pliers, or a hammer and migrate. In either case, be certain not to impairment components. You won't need to twist information technology very far before it unlocks. The edge of the ring will have multiple notches for you to grab with the pliers or to put the drift against. A number of replacement sending units volition include a new lock ring and seal. It is a best practice to always replace the seal under the lock ring. Some suppliers offer lock rings and seals separately.
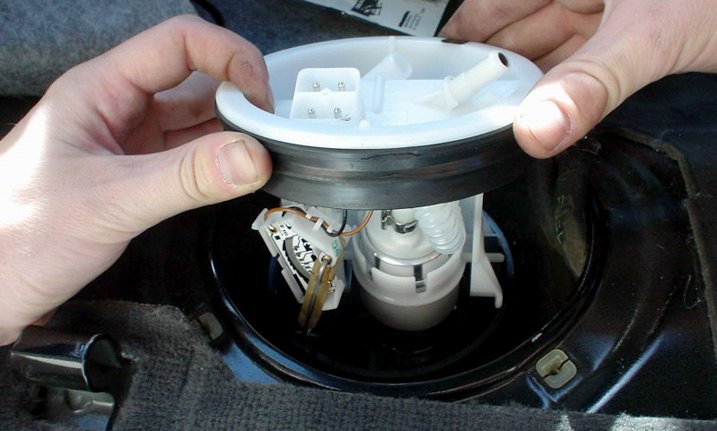
6. Remove the quondam fuel sending unit of measurement by pulling the associates upward through the top. Because there's a long rod and float slice, angling it out may be necessary.
7. Install your new fuel sending unit by beginning placing the new tank seal in place. Lower the new unit into the tank, being sure that if there are whatsoever wires or hoses in the tank, the movable float arm remains clear of interference. Install the lock ring, and practise not overtighten information technology. Reconnect the hoses and wiring connectors, and secure all covers in the reverse order they were removed.
eight. Reinstall the fuel pump relay, and reconnect the battery. Kickoff the car, checking that the fuel gauge works and that in that location are no fuel leaks. The next time you refill the tank, check to make certain that no fuel is seeping from the tiptop of the tank where the sender is installed.
November 06, 2014
Source: https://www.carid.com/articles/how-to-replace-an-in-tank-fuel-sending-unit.html
Posted by: bellgunfoop.blogspot.com
0 Response to "How To Change The Fuel Sending Unit 2011 Camaro"
Post a Comment